The old antenna tower had terminal rust ingress and had to be taken down many years ago. Since then a Hills telescopic mast was sort of making do for smaller antennas.
Have been looking at an NBS hydraulic tilt over mast for a while now and finally got around to doing something about it.
 The bits as they were delivered, foundation (right), mast base (left), tilt section (front). Winch and hydraulic jack in the box. Sliding carriage with rotator between box and tilt section.
The hole is augered using a mini loader (Dingo). As it is a small job, the trick is to wait until a contractor is close by doing some work.

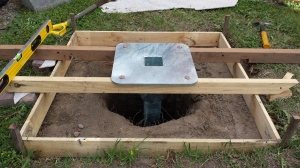
The foundation ready for concrete, but the weather has turned now (of course) and rain is delaying things.
The rain has stopped and the ground dried out a little. Its amazing that a small hole in the ground can affect the weather to such a degree.
We had 35mm of rain in a couple of hours after our driest October on record not long after the hole was dug.
The mast foundation was bolted to some wooden rails to keep it steady and perfectly level.
 When the concrete was going in the hole, the force pushed the foundation slightly despite it’s weight and being fixed down. It took a long pole and some heaving to get it back to level again. 25Mpa concrete was used as per the specification for the mast.
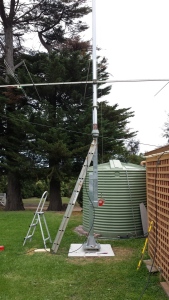
Well, concrete has cured, so the mast base and tilt section have been added. Everything bolted together nicely. The vertical mast base is perfectly vertical which is a relief as the foundation part did move when the concrete was poured.
Now waiting for the mast section to arrive. It costs nearly as much for delivery as the mast section itself as they have to use a crane to get it off the truck.
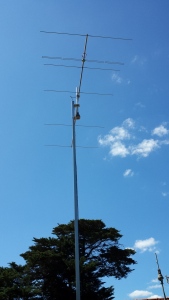
The carriage part houses the rotator slides up the mast so it the antennas can be lowered and worked on a few metres above the ground. I had a rotator in very good condition, which was hardly used that fits the bolt holes in the carriage.
 For the antenna top bearing, I decided to go with a simple arrangement as the antenna will be lightweight. The bearing is there to provide support against side forces on the rotating mast.
A 12mm thick section of PE material from a chopping board is clamped to the top of the rotator carriage. Not too sure on the UV stability of the material though. If the antennas become larger, then the bearing will be upgraded.
The next challenge is getting the mast section into the mast base socket. The angle of the socket does not go to horizontal, limited by the fully contracted hydraulic ram. This means that the high end of the mast must be lifted up to about 2.7 metres so that it is in line with the socket.
 It turned out that with the top cap of the mast base removed and the hydraulic ram removed, the mast socket could be tilted downward to the point where the far end only needed to be a metre off the ground for the mast to line up with the mast socket.
 Kevin pushed the mast section into the mast socket and then lifted the far end of the mast so I could put the hydraulic ram in place. From there on it it was pretty easy, the carriage was slid over the mast, the top pulley installed and the winch rigged.

 The six metre yagi was mounted with relative ease at the height of the ladder.


I will follow this post with interest. Can’t wait to read more.. Good luck with weather and the concrete pour. 🙂
Hi Glenn
My sentiments are similar to those of Andrew’s. I have been there and done that and it is always interesting to see how people go about erecting masts and towers. I know one amateur in SA with the NBS mast and he is very pleased with it. So I will have to be patient and wait for the next episode!
cheers
John D
VK5BJE
Hi John, It has been raining here since the hole was dug! Cup day was fine, but no concrete available. Raining now, so don’t think much will happen tomorrow. Ground too soft for a mini mix in the back yard. The NBS mast components are certainly solid.
Cheers, Glenn.
Glenn,
What are the dimensions of the hole in the ground?
Nev
Hi Neville, the hole should be 1.8m deep and 45cm diameter. In practice, my hole ended up a bit deeper as the guy dug it that way.
Great photos of the installation. I am contemplating putting one up myself. Now to convince the ‘Finance Minister’. Regards Tony VK1VIC/VK2VIC
Hi Glenn,
Just came across your WordPress site while investigating the NBS mast’s.
I am looking to get one later next year.
Very good step by step instructions with pictures, very helpful.
I just have a few of questions:
What length mast did you get and what did it cost? I notice there are 2 lengths for that size square tube, 8m and 12m.
Did you mix your own concrete, or have it delivered by concrete truck?
How are the rotator and antennas held up at the top? Is it via the winch cable?
I will be installing HF yagi’s on my mast, so I hope it will be sturdy enough.
Cheers
Rob
VK4AAC
Hi Rob,
I used an 8m mast section, this was easier to deliver and high enough for my use. I had a mini mix come in the back yard and supply the concrete. The guy delivering the concrete was very helpful and made sure it was poured carefully, accurately and did not disturb the pipe section. I think the mast section was $275 delivered.
The rotator carriage was supplied with the mast hardware, it has a welded plate that has holes drilled for the rotator to bolt into. It seems to be a standardish bolt pattern. At the top of the rotator carriage, I made a bearing myself as per the blog but you could purchase a standard rotator bearing and it should bolt straight on.
The mast is easy to work on which is great and minimises work at heights.
Cheers,
Glenn.
Hi Glenn, thanks for the info, much appreciated.
I assume that you can just lower the antennas via the winch and work on the antennas etc from ground level or from a short step ladder without tilting the mast?
And I guess that in a storm situation you would do the same, leaving the mast upright?
73
Rob
Yes, you can lower the antennas via the winch. To work on them while lowered, I use a 16 ft extension ladder extended a few rungs. With a storm, you could just lower it as I have done many times.
Cheers,
Glenn.